Publish automatically Hugo blog with GitHub Actions
Table of Contents
Repetitive actions are dangerous. Especially if they are simple. We tend to pay less and less attention to them and in the end, we make mistakes. Fortunately it is possible, not to say recommended, to automate these actions.
So today, as you may have guessed, we’re going to change the theme a bit and talk about the pipeline on GitHub Actions.
The context #
I love to write and share, therefore I have this technical blog allowing me to pass on what I learn and what I think is useful to others. My blog is built with Hugo a framework written in go that allows you to design static sites very simply while keeping a great customization. In the same genre, you may know Jekyll.
It is very simple to start a hugo site
hugo new site myBlog
Just as it is easy to generate the static version of the site :
hugo
This last action generates a public folder containing all the code of my blog.
As you can see it is html, css and images files that compose all the pages and articles I wrote until now.
Now I have to publish this new version of my blog to make it accessible. I didn’t want to pay a monthly fee to have a server at a hosting company and have to secure and maintain it. I needed something simple and free in the ideal.
Fortunately GitHub offers GitHub pages. So thanks to my account I have access to a server that can contain static code. So no database, no code to compile (PHP, C#, Swift or other), just html, css and possibly JS files. And it’s perfect because Hugo does exactly that.
The manual process #
Of course, I have started to do the writing and publishing automatically for my blog. The first thing to do is simple: write a new article. I compose my file in markdown format, then I publish with the hugo command, I copy the content of the public folder that I paste in the folder of my repository containing my GitHub Page. I push the changes and after a few moments the new version of my site is available.
You will notice that all these tasks, except the writing of the article, can be automated. They are also a source of errors:
- If I don’t copy the right version of my site, the new article will not be available online.
- If I forget to run the
hugocommand I won’t generate the new version of my blog. - If I forget to push or I push on the wrong branch the result will still not be good.
Also, let’s face it, it’s a pain in the ass. My brain is absolutely not stimulated by these actions and so during this (short) time I get bored. So I might as well have someone else do it, or rather a machine.
Moreover it doesn’t solve the problem to write several articles at the same time. Being on a git, I can afford to make several branches, each one having an article being written. If I mismanage my git and create a new version of my blog on the branch of the article and not on develop after a merge, I may delete a published article without wanting to.
We need to automate all this.
We automate the whole process #
It would be easy to automate all this with a script on my machine. I could make a Python or Swift script executing these actions when I need it. But this poses several problems:
- The script will only be present on one of my machines or I have to duplicate it and be careful when I make changes.
- The script will be made in a language that may not be executable everywhere : I want to be able to write an article anywhere on anything and be able to publish it
- The PATH should be always good on all machines to publish in the right repository.
A lot of complexity for something simple. But remember, we are on GitHub and we have access to GitHub Actions. So that’s what we’ll use to solve our problem.
Definition #
As a reminder the GitHub Actions are :
GitHub Actions makes it easy to automate all your software workflows, now with world-class CI/CD. Build, test, and deploy your code right from GitHub. Make code reviews, branch management, and issue triaging work the way you want.
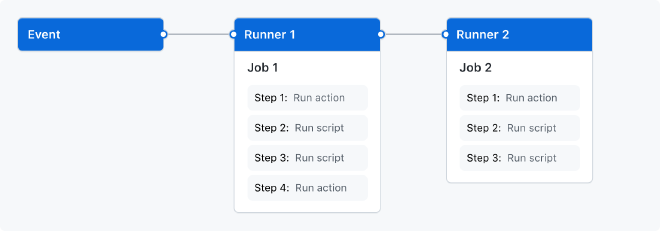
It is a sequence of actions driven by an event. Here is a simple example provided by GitHub:
We can define actions with a YAML file like this one for Swift:
name: Swift

on: [push]

jobs:
  build:

    runs-on: macos-latest

    steps:
      - uses: actions/checkout@v2
      - name: Build
        run: swift build
      - name: Run tests
        run: swift test
We just need to define the name of the pipeline, the event(s) that trigger it, where we execute our pipeline (macOS, linux, …) and the different steps. In this case:
- checkout
- build
- test
Of course for us it will not be the same.
Our need #
We need to translate our manual actions into GitHub actions and define who will do what.
As you can see, there is nothing very complicated here. Let’s see what we can do now.
Define the YAML file #
Let’s start by defining the basis of any YAML file for GitHub Actions: the name, the events allowing its triggering.
For the name let’s keep it simple. We want to publish a new article automatically, so we’ll take : Auto publish post
As for the events, what can we do? First of all let’s remember that we want to publish an article when it has been validated. There is nothing better than PR to validate code, whether it is done in Swift, in Go or in Markdown. The publishing process should only be triggered when there is a merge on the main main branch.
name: Auto publish post

on:
  push:
    branches:
      - main
The first job #
Checkout source code #
It goes without saying that it is necessary to get the source code before doing anything. Of course GitHub has provided the necessary for that, you just have to call the following command :
- uses: actions/checkout@v2
  with:
     submodules: true
     fetch-depth: 0
Since our pipeline is on the repository containing the code for our site, you don’t need to get the code from another repository. This one will suffice.
I purposely added submodules in the checkout command because some of you will be using Hugo themes via submodules.
Install Hugo on the pipeline #
Before generating our site we need to get our Hugo dependency and install the necessary. As on any machine, we have to download the binary and install it, but as Hugo is dependent on Go we have to install this dependency too.
Fortunately for us there is already a developer who has done the necessary for us, I present you peaceiris !
- name: Setup Hugo
  uses: peaceiris/actions-hugo@v2
  with:
    hugo-version: 'latest'
    extended: true
This plugin will allow us to save a lot of time while avoiding to write scripts ourselves. For Hugo’s version, I advise you to put the version you use locally to have the same behavior as when you test on your machine.
Generate the static site #
Now that we have our version of Hugo, we can generate our site. To do this, nothing could be simpler, it is the same command as on your local machine:
- name: Build
  run: hugo --minify
Here I added the argument --minify but nothing mandatory.
Deploy the new version of the site #
It only remains for us to deploy our site. And this is the most complicated part since we want to deploy on another repository. Here again we will use the command provided by peaceiris which will save us a lot of time:
- name: Deploy
  uses: peaceiris/actions-gh-pages@v3
  with:
    deploy_key: ${{ secrets.DEPLOY_KEY }}
    publish_dir: ./public
    destination_dir: ./blog
    external_repository: MyUser/MyUser.github.io
    user_name: 'MyUser[bot]'
    user_email: 'MyUser[bot]@users.noreply.github.com'
    full_commit_message: "🗞 Publish a new post!"
    publish_branch: main
publish_dirallows you to define the folder to publish or more precisely the contents of the folder to publish.destination_dirallows you to define the destination folderexternal_repositoryallows you to define the target GitHub repositoryuser_nameanduser_emailallows you to define the information of the user publishing the new versionpublish_branchthe target branchfull_commit_messagerepresents the commit message
However the most important part here without which nothing will work is the deploy_key field. You will have to create a new key without password that we will add to the target repository. To do this you just need to run the following command on your machine:
ssh-keygen -t rsa -b 4096 -C "$(git config user.email)" -f my_new_key -N ""
This command will generate 2 files:
my_new_key.pubwhich is the public keymy_new_keywhich is the private key
If you want more information, I let you visit the README of the peaceiris repository which contains all the information. And a very big thank you to him for these commands!
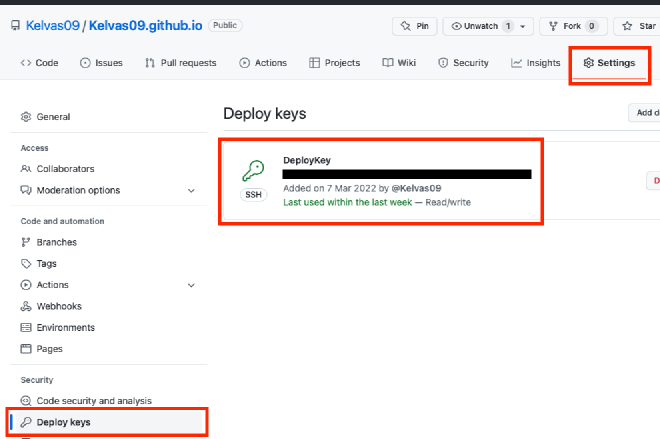
First add your public key in the Deploy key section of the target repository parameters:
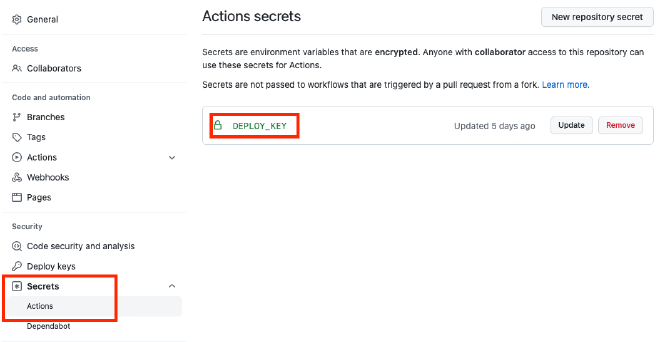
And then it will be necessary to add in the secrets of the repository containing the sources of your site the private key :
From there it will be possible for the plugin to publish changes in your target repository. Here is the complete code of the pipeline:
name: Auto publish post

on:
  push:
    branches:
      - main

jobs:

  BuildAndPublish:
    runs-on: ubuntu-latest
    steps:

      - run: echo "🎉 The job was automatically triggered by a ${{ github.event_name }} event."

      # First we fetch sources
      - uses: actions/checkout@v2
        with:
          submodules: true
          fetch-depth: 0

      # Then we install hugo binary with specific version
      - name: Setup Hugo
        uses: peaceiris/actions-hugo@v2
        with:
          hugo-version: 'latest'
          extended: true

      # We build blog
      - name: Build
        run: hugo --minify

      # We deploy to github pages
      - name: Deploy
        uses: peaceiris/actions-gh-pages@v3
        with:
          deploy_key: ${{ secrets.DEPLOY_KEY }}
          publish_dir: ./public
          destination_dir: ./blog
          external_repository: MyUser/MyUser.github.io
          user_name: 'MyUser[bot]'
          user_email: 'MyUser[bot]@users.noreply.github.com'
          full_commit_message: "🗞 Publish a new post!"
          publish_branch: main
How to test? #
The main branch #
If this is your first time with GitHub Actions, you may not yet be aware that you can’t run actions anywhere other than the main branch of your repository, which by default is the main' branch, or master’ if your repository is a bit old. But we don’t necessarily want to test on this branch. Especially if it is a public repository.
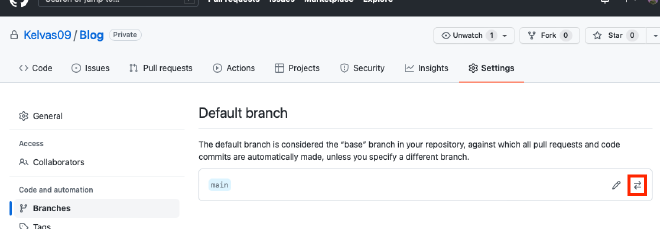
To do this I advise you to temporarily change your main branch for the branch on which you develop your pipeline.
For those who don’t know, you have to go in the parameters of your repository (in red here):
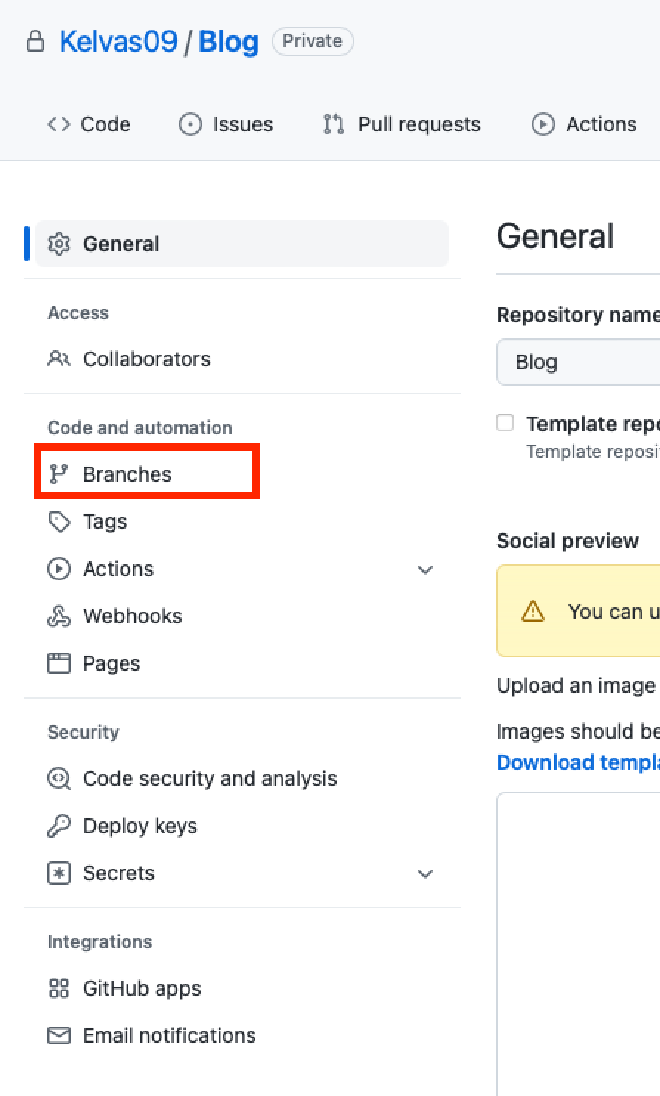
Once on the page you can select a new branch (in red here):
Manual launch #
By default a pipeline cannot be started manually. For this you will need to add the following piece of code:
workflow_dispatch:
This will result in something like this:
name: Auto publish post

on:
  workflow_dispatch:
  push:
    branches:
      - main
But I advise you not to leave it once your script is tested and validated. Leaving the possibility to launch the pipeline whenever we want is not relevant since we want to publish articles and these are managed on separate branches.
Moreover, we used the on.push event which means that if you merge a branch into main or if you push something on this branch the pipeline will be activated.